Dubai Chocolate Bar Recipe (Bite Size)
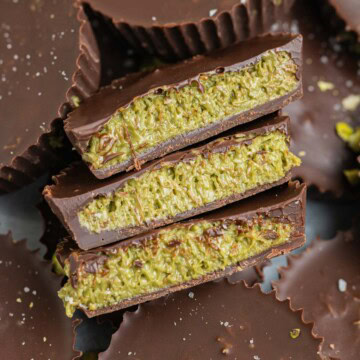
This irresistible, bite-sized Viral Dubai Chocolate Bar Recipe is super simple to whip up, incredibly tasty, and guaranteed to have you reaching for more! Featuring crispy kataifi dough, rich pistachio cream and tahini filling, all coated in smooth melted milk chocolate and topped with a sprinkle of sea salt.
Ingredients
- 200 grams shredded kataifi dough cut into small pieces
- 4 tablespoon (56 g) unsalted butter
- 185 grams pistachio cream (more if you like it creamier)
- 2 tablespoon (30 g) tahini
- pinch of salt
- 3 cups (540 g) milk, semi-sweet or dark chocolate see notes on tempering chocolate
- sea salt for finish
Instructions
- Prep:- line two 12-cup muffin/cupcake pans with cupcake liners and set aside (this recipe makes about 20).- Cut up the kataifi dough into pieces.200 grams shredded kataifi dough
- Preheat a large skillet on medium heat and melt 4 tablespoon of butter, then add the kataifi dough and coat in butter. 4 tablespoon might seem like a lot of butter initially but it's important to coat all the pastry dough in butter so that it crisps up. Continue stirring (don't leave it, otherwise parts of it could start burning). It will take about 10-15 minutes to get all the pastry dough crispy and golden brown. Just keep stirring until you reach the desired color and all the dough is now golden brown. Pour crispy kataifi into a bowl, add the pistachio cream, tahini, pinch of salt, and stir. Set aside.4 tbsp (56 g) unsalted butter, 185 grams pistachio cream , pinch of salt, 2 tbsp (30 g) tahini
- In a microwave safe bowl, add the chocolate (you could do this in batches, if you're more comfortable melting chocolate in smaller quantities) and microwave in 30 second increments until melted, making sure to stir between increments. -see notes below for how to use a double boilerIf you've never melted chocolate before, this is how you do it. Place the chocolate in the microwave and microwave for 30 seconds. Remove it from the microwave and stir for about 30 seconds. Return to the microwave and again, heat for 30 seconds. Remove from the microwave and stir again. As you stir, the chocolate will continue to melt. If chocolate chunks remain, return it to the microwave and add an additional 30 seconds. Continue this until the chocolate is completely melted. If using chocolate chips, add a teaspoon of coconut oil to help it thin out and melt more evenly. It also helps stay melted for longer.3 cups (540 g) milk, semi-sweet or dark chocolate
- Using a tablespoon, pour chocolate into each cupcake liner. To spread it out, move the liner from side to side and it should spread out on its own. SIDE NOTE: you could freeze the bottom layer for 5 minutes to avoid the chocolate mixing with the filling. I don't do this because I don't mind it mixing. But if you feel more comfortable, you could freeze it.
- Once evened out, scoop in about 1 to 1½ tablespoon of filling to each cup. You can use a spoon to flatten it out just a little. Once you're satisfied, fill the cups with a tablespoon of chocolate each, or more if you have any leftover and it looks like it needs more chocolate.To spread out the chocolate evenly around, just lift the cupcake pan and tilt it back and forth slowly and it should move the chocolate around. If it doesn't spread all around the filling, it's ok!
- Refrigerate for about 30 minutes to an hour until the chocolate is set. You can add a sprinkle of sea salt to the top.sea salt for finish
- Place them in an airtight container and refrigerate for up to 5 days. You can eat them cold, straight from the fridge, or let them come to room temperature.
Video
Notes
Double Boiler method -
When I first got married, our very first apartment had no microwave, so I had to learn the double boiler method. It's a lot easier than it seems!
Here’s how to melt chocolate using a double boiler:
- Set Up the Double Boiler: Fill a medium-sized pot with about 1-2 inches of water. Make sure the water doesn’t touch the bottom of the bowl you’ll be using. Place the pot over low to medium heat. Use a heatproof glass or metal bowl that fits snugly over the pot without touching the water. Place your chopped chocolate or chocolate chips in the bowl.
- Melt the Chocolate: Let the heat from the steam gently melt the chocolate, stirring occasionally with a spatula or spoon to encourage even melting. Keep an eye on the water level to prevent it from evaporating, and avoid letting the bowl touch the water directly (this will burn or seize the chocolate). Stir the chocolate until it’s fully melted and smooth.
- Once melted, remove the bowl from the pot and use as directed in the recipe above.
- With thermometer: To temper chocolate, melt ⅔ of it gradually over a double boiler or in the microwave until it reaches 115°F (for dark chocolate) or 105°F (for milk or white). Remove from heat and stir in the remaining third of finely chopped chocolate to cool it down to 84°F. Then gently reheat it to 89°F.
- Without thermometer: Start by melting ⅔ of it slowly over a double boiler or in short increments in the microwave until smooth. Then, stir in the remaining ⅓ (finely chopped) to cool it down, stirring constantly until fully melted and slightly thickened. Gently warm it back up just a little if needed.
Nutrition
Calories: 242kcalCarbohydrates: 27gProtein: 3gFat: 15gSaturated Fat: 10gPolyunsaturated Fat: 1gMonounsaturated Fat: 4gTrans Fat: 0.1gCholesterol: 6mgSodium: 57mgPotassium: 129mgFiber: 2gSugar: 19gVitamin A: 71IUVitamin C: 0.1mgCalcium: 20mgIron: 2mg
Tried this recipe?Mention @siftwithkima or tag #SiftwithKima on Instagram!
