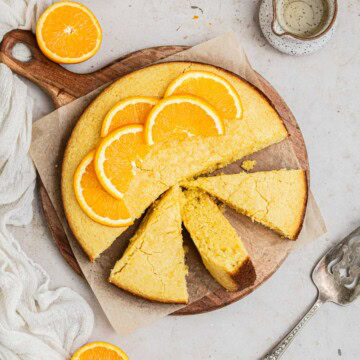
A decadent and moist Mini Chocolate Cake that is easy to prep and bake, covered in a delicious chocolate frosting, and topped with fresh fruit. This is the perfect cake to celebrate birthdays, Valentine's Day, or a fun brunch party.
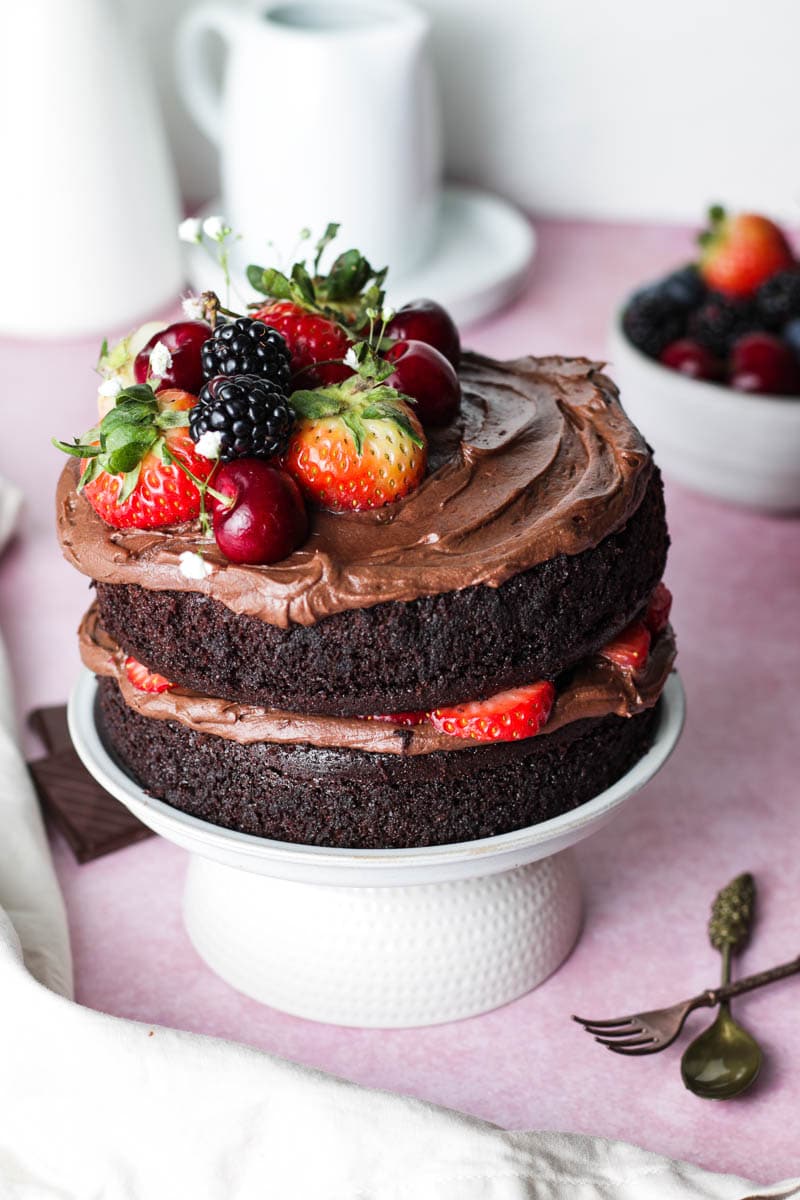
Valentine's Day is just around the corner, so it's time to break out the small-batch baking for your loved ones! This Mini Chocolate Cake with Chocolate Frosting will wow your significant other, and make them fall in love with you! The small chocolate cake is made with two 6 inch chocolate cake layers, then covered in a buttercream flavored with cream cheese, cocoa powder, and melted chocolate. It's rich, decadent, and a total show stopper!
If you'd like to make a larger version, use my Chocolate Ganache Cake recipe, or even my Chocolate Sheet Cake.

Jump to:
♥ Why You'll Love This Recipe
Mini - Who doesn't like a miniature size of anything? This cake is absolutely adorable, but it's also great for small crowds!
Chocolate lover's Dream - The deep chocolate flavored cake paired with the chocolate frosting creates such a rich and indulgent cake. It's absolutely amazing, and perfect for anyone who loves chocolate!
One bowl - This mini chocolate cake can be made in one bowl for easy clean-up and less hassle.
📝 Ingredient Notes
A full list of ingredients, quantities, and instructions are located in the recipe card at the end of the post.
Chocolate Cake
- All-Purpose Flour: This recipe is best used with all-purpose flour for the best structure. Make sure to use a scale to measure your flour to avoid a dry cake.
- Dutch Process Cocoa powder: I like using Dutch Process cocoa powder instead of natural because it gives a deeper and more intense chocolate flavor. I do highly recommend a great quality cocoa powder, but if all you have is natural, then you can use that. Make sure it's unsweetened.
- Baking powder & Baking Soda: Using leavening agents will help the cake rise and give a tender crumb and help with structure.
- Salt: The salt enhances the flavors and sweetness.
- Sugar: I like using a mixture of granulated sugar and brown sugar. The brown sugar adds extra moisture to the cake.
- Espresso powder & Coffee: Both will intensify the chocolate flavor. If you're not a coffee drinker, no worries because you won't taste it. But if you have issues with coffee, leave out the espresso powder and sub the coffee with water.
- Buttermilk: Buttermilk creates such a tender and moist crumb. You can sub yogurt or sour cream.
- Vegetable oil: Oil instead of butter in chocolate cake is one of the key ingredients that creates a moist and tender cake. Use any neutral oil. I've even had good results using olive oil.
- Eggs: They help bind the cake and give it structure.
- Vanilla extract: Adds even more flavor!
Chocolate Buttercream
- Unsalted butter: As with all buttercreams, we start by creaming butter. I like unsalted because I can control the amount of salt.
- Cream Cheese: I love adding cream cheese to my chocolate frosting. It's a very small amount in this recipe, but if you don't like it, you can leave it out.
- Cocoa Powder: I like using dutch process cocoa powder for the deep flavor.
- Melted Chocolate: Adding a little melted chocolate enhances the chocolate flavor of the buttercream.
- Powdered sugar: to sweeten and create fluffiness and structure.
- Heavy whipping cream: Used to thin out the buttercream if it becomes too thick to work with.
- Salt: adding salt enhances the flavors
See recipe card for quantities.

🍫 Dutch Process vs Natural Cocoa Powder
Dutch Process Cocoa Powder is treated in an alkaline solution, which neutralizes its acidity, making it smoother, deeper, and darker in color. Because of this, it does not react with baking soda, and when added to chocolate cake, it's typically paired with baking powder. Natural cocoa powder, however, is acidic, so you'll find chocolate cake recipes that call for natural cocoa powder to also call for baking soda because they react to each other, creating a rise in the cake.
When a recipe doesn't call for a leavening agent, you can use either Dutch Process or Natural cocoa powder in the recipe. However, if a recipe calls only for baking soda, it's probably best to use natural cocoa powder, as it will not react to dutch process because it is not acidic, and baking soda needs an acid to react. Make sure to read the notes and recipes carefully and use what is instructed in the recipe.
This Mini Chocolate Cake recipe calls for Dutch Process, but you can also use Natural because both baking soda and baking powder are used in this recipe. This chocolate cake recipe calls for more baking soda than baking powder, but it does not need the Dutch Process Cocoa Powder as an acid; instead the baking soda reacts with the acid in the buttermilk to yield a more tender and fluffier cake.
For more information, check out this article on the difference between Dutch Process and Natural Cocoa Powder.

🍴Special Equipment
Kitchen Scale: It's so important to use a kitchen scale for accurate results.
Baking Pan: You'll need 2 6 inch round baking pans. I highly recommend purchasing a good quality baking pan for your cakes.
Mixing bowls: I love using glass Mixing Bowls when making batters and doughs.
Mixer: You can use a stand mixer, or a handheld mixer for the frosting.
Parchment paper - I love using pre-cut parchment paper. You can either get the large sheets or pre-cut round sheets.
⇄ Substitutions
Sugar: You can use all granulated sugar if you don't have any brown sugar.
Sour cream or Greek yogurt: Instead of buttermilk, use sour cream or greek yogurt.
Natural Cocoa powder: If you don't have dutch process cocoa powder, you can use natural. It will work in this recipe. However, it will have a less intense chocolate flavor, and not as dark of a color.

✨ Variations
Single Layer: You can turn this cake into one single layer by using one 8 inch round baking pan.
Sheet cake: Instead of a round single layer cake, you can make this in a 9x13 pan. You'll need to double the recipe. Use this Chocolate Sheet Cake recipe for reference.
Frosting: Switch up the frosting by making a chocolate ganache or a regular chocolate cream cheese frosting. You can even change it up and use a strawberry cream cheese frosting, that would pair perfectly with this Mini Chocolate Cake.
𓎩 Step-by-Step Instructions
A few instruction photos to help you nail this recipe every time.
Easy steps with photos to guide you through making this Mini Chocolate Cake.

Step 1
In a bowl, add flour, cocoa powder, baking soda, baking powder, salt, espresso powder, granulated sugar, and brown sugar, and whisk and set aside.

Step 2
In another bowl, add the eggs, vanilla extract, vegetable oil, buttermilk, and vanilla, and mix until completely combined.
Add the dry ingredients and then mix with a whisk until combined. The mixture will be a little thick.

Step 3
Add Coffee - Slowly add the hot coffee until completely mixed together and smooth.

Step 4
Pour the batter evenly into prepared pan and bake for about 30-35 minutes until toothpick inserted comes out clean. Every oven is different, so start checking at 28 minutes.

Step 5
In a stand mixer fitted with a paddle attachment (you could use a hand mixer), beat the butter and cream cheese until smooth and light in color, about 5 minutes.
Add the salt, cocoa powder, then powdered sugar one cup at a time until completely combined. Add the melted chocolate and beat another minute.
If the buttercream is too thick, add heavy cream one tablespoon at a time until the buttercream is smooth. Beat an extra 5 minutes until it's a fluffy and a smooth consistency.
Step 6
Assemble: Level the cakes using a knife.
Place one cake layer on a cake stand or serving plate and add half the buttercream and smooth using an offset spatula. Place the second layer on top, then add the remaining buttercream and smooth.
Add fruit, sprinkles, or any other desired toppings.
💬 FAQ
The hot coffee does two things: it brings out the flavor of the chocolate, but the hot liquid 'blooms' the cocoa powder, which essentially intensifies the flavor.
I do have a dairy-free chocolate cake recipe that you can use, and it's delicious.
Yes, absolutely. You can make the cake about a day ahead of time. More than that and you'll want to properly store the layers in the freezer to keep the freshness.
💡Pro Tips
Measure Flour Correctly: As always, with any recipe, use a kitchen scale, as it is the best form of measuring your ingredients. If you don't have a kitchen scale, fluff your flour, scoop flour with a spoon into a measuring cup and level off.
Room temperature ingredients: When called for, it's always best to use room temperature ingredients. This helps the ingredients mix together properly.
Line pans: Prep your pans with parchment paper at the bottom, and grease your pans to make sure the cakes come out in one piece.
Don't over mix: Using a spatula or whisk instead of a hand mixer reduces the chances of over mixing, but once your ingredients come together, stop mixing.
Don't over bake: Start checking the cake at 28 minutes to ensure you don't over bake.
Make Ahead: You can make the chocolate cake layers in advance. Just make sure to wrap it tightly and refrigerate it. If you plan to make it ahead by more than 3 days, I suggest wrapping it tightly with saran wrap, then aluminum foil, then placing it in the freezer. Let it thaw in the freezer overnight when ready to use.
❄ Storage
Fridge: Once frosted, store the leftover Chocolate Cake wrapped up in the fridge for 3-5 days.
Freezer: You can wrap this chocolate cake tightly and store in the freezer for 2-3 months. When ready to eat, let thaw in the fridge overnight, then let it come to room temperature. If you have the intention of storing this cake in the freezer, I would store it unfrosted, and the chocolate cake layers last quite a while and they stay extra moist.

Did you make this recipe or any other recipe on my website? I'd love to hear about it! Please leave a 🌟 star rating and let me know how it went in the 📝 comments below. Don't forget to Tag me on Instagram or Facebook when you recreate a recipe! The feedback helps both me and the readers!
Also, be sure to add us as a trusted site on Google so that our recipes show up more in your searches!
📖 Recipe Card

Mini Chocolate Cake
Ingredients
Mini Chocolate Cake
- 1 cup (120 g) all purpose flour
- ⅓ cup (33 g) Dutch Process Cocoa powder
- ½ cup (100 g) granulated sugar
- ½ cup (100 g) brown sugar, packed
- 1 teaspoon (1 teaspoon) espresso powder
- 1 teaspoon (1 teaspoon) baking soda
- ½ teaspoon (½ teaspoon) baking powder
- ½ teaspoon (½ teaspoon) salt
- 1 (1) large egg
- ½ teaspoon (½ teaspoon) vanilla extract
- ¼ cup (54.5 g) vegetable oil
- ½ cup (120 g) buttermilk
- ½ cup (118.5 g) hot coffee
Chocolate Buttercream
- ¼ cup (56.75 g) unsalted butter room temperature
- 2 oz. (2 oz.) cream cheese cold
- 1½ cups (180 g) powdered sugar
- 2 tablespoon (10 g) cocoa powder
- ¼ cup (45 g) chocolate chips melted
- ½ teaspoon (½ teaspoon) salt
- heavy cream or milk as needed to thin out consistency if too dry
Topping
- Fruit optional
Instructions
Chocolate Cake
- Pre-heat the oven to 350℉. Grease TWO 6 inch cake pans and line with parchment paper.
- In a bowl, add flour, cocoa powder, baking soda, baking powder, salt, espresso powder, granulated sugar, whisk and set aside.1 cup (120 g) all purpose flour, ⅓ cup (33 g) Dutch Process Cocoa powder, ½ cup (100 g) granulated sugar, ½ cup (100 g) brown sugar, packed, 1 tsp espresso powder, 1 tsp baking soda, ½ tsp baking powder, ½ tsp salt
- In another bowl, add the buttermilk, neutral oil, 1 egg, and vanilla, and mix until completely combined. Add the dry ingredients and then mix with a whisk until combined. The mixture will be a little thick.1 large egg, ½ tsp vanilla extract, ¼ cup (54.5 g) vegetable oil, ½ cup (120 g) buttermilk
- Slowly add the hot coffee until completely mixed together and smooth.½ cup (118.5 g) hot coffee
- Pour the batter evenly into prepared pans and bake for about 30-35 minutes until toothpick inserted comes out clean.
- Let cool before frosting.
Chocolate Buttercream
- In a stand mixer fitted with a paddle attachment (you could use a hand mixer), beat the butter and cream cheese until smooth and light in color, about 5 minutes.¼ cup (56.75 g) unsalted butter, 2 oz. cream cheese
- Add the salt, cocoa powder, then powdered sugar one cup at a time until completely combined. Add the melted chocolate and beat another minute.1½ cups (180 g) powdered sugar, 2 tbsp (10 g) cocoa powder, ¼ cup (45 g) chocolate chips, ½ tsp salt
- If the buttercream is too thick, add heavy cream one tablespoon at a time until the buttercream is smooth. Beat an extra 5 minutes until it's a fluffy and a smooth consistency.heavy cream or milk
Assembly
- Level the cakes using a knife.
- Place one cake layer on a cake stand or serving plate and add half the buttercream and smooth using an offset spatula. Place the second layer on top, then add the remaining buttercream and smooth.
- Add fruit, sprinkles, or any other desired toppings.
- Store leftovers in the refrigerator.
This cake is so good and easy to put together! We really loved the frosting with the addition of cream cheese.
Thank you so much for the review, Chelsey! Appreciate you trying out my recipe! 🙂