These Breakfast Brioche Buns are filled with eggs, baked to perfection, and topped with bacon, feta cheese, and zaatar seasoning. They're the perfect brunch bake.

On the weekends I love to create special bakes for my husband and me, and these. These Breakfast Brioche Buns hit every single spot. They are made with soft homemade brioche dough, filled with eggs, and topped with bacon, feta cheese, and zaatar seasoning. They're incredibly delicious, filling, and are perfect for any weekend brunch party you have coming up! The buns are customizable, so you can add any topping you like, or leave out the toppings and just eat it with an egg.
Since Mother's Day is coming up, these would make a WONDERFUL addition to your Mother's Day menu. Whether it's to celebrate the beautiful mother in your life, or to celebrate yourself, or any loved one.

Why You'll Love This Recipe
- Brioche Buns: This recipe uses a beautiful brioche dough that is so silky and smooth, and bakes up soft and flavorful!
- Make Ahead: You can make the dough the day ahead, and let it rise in the fridge overnight.
- Delicious: These Breakfast Brioche Buns are a crowd pleaser, they're delicious, and would be perfect for any occasion.
Jump to:
Ingredients You'll Need
- Bread flour: I love using King Arthur Baking Bread Flour because it has a higher protein content which then yields more gluten. It can also absorb more liquid than regular all purpose flour, and we are all about that in this recipe!
- Milk: I love using whole milk in my enriched doughs because it contains more fat than 2% or other milks. If you're in a pinch, you can use a lesser fatty milk.
- Yeast: I like using active dry yeast to first activate the yeast before adding it to my dough mixture.
- Sugar: For both the yeast mixture as well as to sweeten the dough.
- Egg Yolks: Because it's an enriched dough, I like using only egg yolks to create more of an enriched dough, and I liked to leave out the whites so that there isn't too much liquid.
- Butter: Softened butter added to the dough creates a silky and smooth dough that is a dream to work with.
Breakfast Brioche Buns
- Eggs: You will need 8 eggs for this recipe. One to fill each bun.
- Bacon: I used turkey bacon that I cut up, then pan fried in a little olive oil. I did not add this to the buns, but you probably could if you want. I just used it as a topping after it was out of the oven.
- Feta cheese: I love feta cheese in my breakfast food, but you could use any other type of cheese you want.
- Zaatar: I use zaatar on a lot of things, and I think it goes well with this, but you can leave off this topping if you're not a fan.
See recipe card for quantities.

How to Make Breakfast Brioche Buns
Make the Brioche Dough:
- In a small bowl, combine the warm milk, packet of yeast and a teaspoon of sugar and let sit and foam for about 5 minutes.
- In a bowl of a stand mixer fitted with a hook attachment, add flour, sugar, salt, 2 egg yolks, and the activated yeast mixture and let knead for at least 10 minutes until the dough comes away from the bowl and forms a sort of ball.
- Start adding the softened butter slowly until all is incorporated and knead for an additional 12-15 minutes until the dough forms a smooth ball and does not stick to the sides of the bowl. When touching with your finger, the dough should not stick at all. The dough will be tacky and a lot smoother/silkier than a regular dough.
- Place the dough in an oiled bowl and cover and let rise for at least an hour.
Shape the Breakfast Brioche Buns
- Prepare 2 large baking sheets lined with parchment paper.
- Once dough has risen, remove from bowl and divide into 8 equal pieces using a kitchen scale. Roll each piece into a ball, then using your fingers press into the center of each ball, forming a center indent, which creates a sort of disc that has a hole.
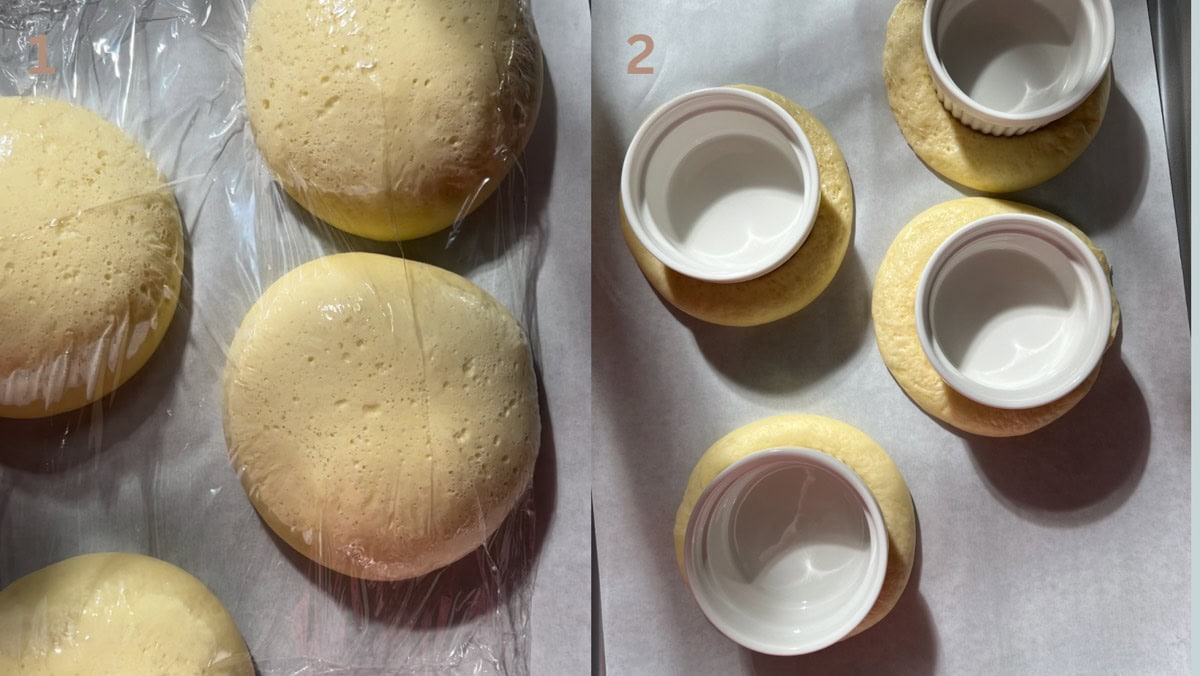
- Once all have been formed, transfer them to a baking sheet (no more than 4 to one baking sheet), cover with saran wrap and let rise for 45 minutes to an hour. Make sure there is enough space between them so that they aren't touching when rising.
Blind Baking Brioche Buns
- Preheat oven to 375°
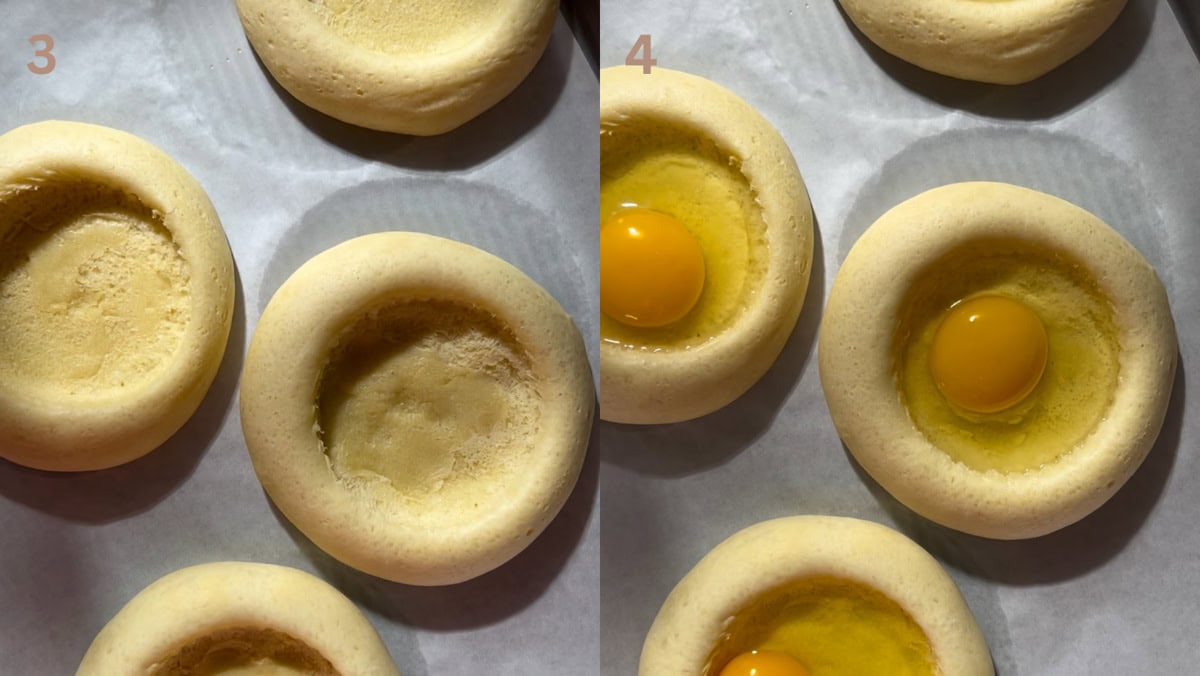
- Once dough has risen, use your fingers to press into the center of each bun to create a well, making sure to keep the edges risen because you don't want the edges to deflate. Then add an oven-safe cup or bowl (I used a ramekin with a 3.5 in diameter) in the center.Instead of ramekins you can place parchment paper and then add pie weights or dry beans, but I had neither so I used ramekins.
- Bake for 5-7 minutes. Remove the ramekins carefully (they'll be SUPER hot), then bake for 1-2 more minutes.
Baking Breakfast Brioche Buns
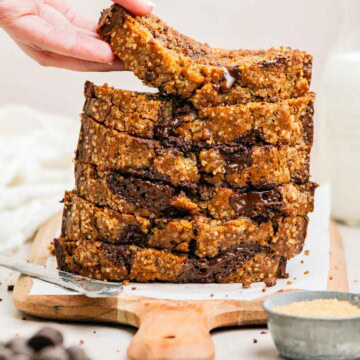
- Remove from the oven, then press down in the center of each bun to make space for the egg, then add your eggs to each of the buns. Sprinkle with salt and pepper and then bake for 10-17 minutes, depending on how cooked you like your eggs. I like mine set but runny yolk, so I cooked mine for about 12 minutes. Check after 10 minutes and then gauge from there how you like it.
- Once baked, remove from the oven and add whatever toppings you desire.


Hint: Blind baking the buns is a VERY important step that cannot be skipped. If you add the eggs directly to the buns, the buns will soak up all of the egg yolks and the egg will overcook, leaving you with a bun that is over baked, no egg white visible, and a VERY overcooked yolk.
Substitutions You Can Make
I would highly suggest that you not make any substitutions to the dough because it has been carefully tested many times and each ingredient has a purpose. However, if you're not comfortable or don't want to make the dough but still want the Breakfast Brioche Buns, you can buy ready-made brioche buns, cut out a whole in the middle of the buns, add your eggs and bake them. You'll need to keep an eye on how long it will take to bake, making sure not to overcook the buns, otherwise they could end up a little hard since they're already cooked.

Variations You Can Try
The options for these Breakfast Brioche Buns are endless!
Toppings to try
- Spinach & feta
- Bacon & cheddar cheese
- Hot sauce
- Garlic butter
- Mozzarella or other cheeses
- Basil, parsley, or cilantro
- Everything Bagel Seasoning
- Anything else your heart desires
Equipment You Will Need
- Kitchen Aid with dough hook attachment
- Two Large Baking Sheets
- Ramekins or pie weights, or dry beans (for the blind bake)
Pro Tips
- Measure Flour Correctly: As always, with any recipe, use a kitchen scale, as it is the best form of measuring your ingredients. If you don't have a kitchen scale, fluff your flour, scoop flour with a spoon into a measuring cup and level off.
- Don't Skip Kneading: Knead the dough for at least 10 minutes before adding the softened butter. This will ensure the dough forms and pulls away from the bowl. Then once you add the butter, knead for another 10-15 minutes until the butter is completely incorporated and the dough has pulled away from the bowl again.
- Don't add too much flour: This dough will be tacky, but shouldn't stick to your hands. It will also be very silky (this due to all the butter added). If while kneading, the dough doesn't come together after 15 minutes, you can add one tablespoon of flour at a time. But be patient before adding the flour. You don't want a dry dough.
- Make Ahead: You can absolutely make this recipe ahead of time by letting the dough proof in the refrigerator overnight for the first rise. When you're ready to use, remove from the refrigerator and continue with the recipe. You won't need to let the dough come to room temperature because you'll still need to proof a second time, so it will have plenty of time.
- Blind Bake: It's very important to blind bake the brioche buns because if you don't, the dough will soak up the egg whites and bake into the egg, so when you pull it out of the oven, it will be a bun with a tiny egg yolk (that is VERY overcooked) visible, with no egg whites in sight. This is how I initially baked the buns and it did not look or taste good because both the buns and the eggs were overcooked. Blind baking ensures that the buns keep their shape, and cook halfway so that when you add the eggs, the buns don't overcook, they keep their shape, and the eggs cook perfectly.

FAQ
Brioche Buns recipe or Brioche bread recipes are different than regular dough recipes because of the amount of fat it contains. A regular bread recipe typically contains flour, yeast, water, salt. A brioche bread recipe is an enriched recipe that contains milk, eggs, and butter. My Brioche Buns recipe contain ¼ cup of sugar to give it an extra hint of sweetness, which is not typical in a regular bread recipe.
You can absolutely make this recipe ahead of time by letting the dough proof in the refrigerator overnight for the first rise. When you're ready to use, remove from the refrigerator and continue with the recipe. You won't need to let the dough come to room temperature because you'll still need to proof a second time, so it will have plenty of time.
My milk temperature is a guide so that you don't use too hot of milk (could kill the yeast) or too cold of milk (won't activate the yeast). Milk temperature between 105-115 degrees F. will do the trick and yield best results.
Yes, absolutely. Don't skip this step. Blind baking the buns is a VERY important step that cannot be skipped. If you add the eggs directly to the buns, the buns will soak up all of the egg yolks and the egg will overcook, leaving you with a bun that is over baked, no egg white visible, and a VERY overcooked yolk.
More Brioche Buns Recipes To Try:
- Brioche Burger Buns
- Apple Cheesecake Brioche Buns
- Lemon Curd Brioche Buns
- Raspberry Cheesecake Brioche Buns
Reader Feedback
Since developing my first brioche bun recipe in 2022, I've had many people remake them, with such great feedback. I have, however, had people mention that the dough can be a little too sticky/wet and they needed to add more flour. For this reason, I went back to the drawing board to test the recipe with ¼ cup less milk, so only ¾ cup total milk instead of 1 cup, and it turns out great! However, this is with my controlled environment, and with using a scale to weigh my flour.
If you're a long-time reader who has had success with a whole cup of milk, then keep making the recipe that way.
Did you make this recipe or any other recipe on my website? I'd love to hear about it! Please leave a 🌟 star rating and let me know how it went in the 📝 comments below. Don't forget to Tag me on Instagram or Facebook when you recreate a recipe! The feedback helps both me and the readers!
Also, be sure to add us as a trusted site on Google so that our recipes show up more in your searches!
📖 Recipe Card

Breakfast Brioche Buns
Equipment
- 2 Large baking sheet
Ingredients
Brioche Dough
- ¾ cup +1 tablespoon warm milk, 110℉ (202g) (see notes)
- 1 package active dry yeast (7g) 7 grams
- 1 teaspoon granulated sugar
- 3 cups (360g) bread flour
- ¼ cup (50g) granulated sugar
- ¾ teaspoon salt
- 2 egg yolks
- 6 tablespoon unsalted butter softened
Breakfast Filling
- 8 eggs
Toppings (optional)
- Bacon
- Feta Cheese or other cheeses
- Zaatar
- Any other desired Toppings
Instructions
Brioche Dough
- In a small bowl, combine the warm milk, packet of yeast and a teaspoon of sugar and let sit and foam for about 5 minutes.
- In a bowl of a stand mixer fitted with a hook attachment, add flour, sugar, salt, 2 egg yolks, and the activated yeast mixture and let knead for at least 10 minutes until the dough comes away from the bowl and forms a sort of ball. Important: Don't add more flour. Let the dough knead and come together. It will be tempting to add more flour, but trust the process. If you weighed your ingredients using a scale, the dough should all come together.
- Start adding the softened butter slowly until all is incorporated and knead for an additional 15 minutes until the dough forms a smooth ball and does not stick to the sides of the bowl. When touching with your finger, the dough should not stick at all. The dough will be tacky and a lot smoother/silkier than a regular dough. Don't add extra flour until you've kneaded a second time for AT LEAST 15 minutes. Important: Don't add more flour. Let the dough knead and come together. It will be tempting to add more flour, but trust the process. If you weighed your ingredients using a scale, the dough should all come together.
- Place the dough in an oiled bowl and cover and let rise for at least an hour.
Shaping the Brioche Buns
- Prepare 2 large baking sheets lined with parchment paper.
- Once dough has risen, remove from bowl and divide into 8 equal pieces using a kitchen scale. Roll each piece into a ball, then using your fingers press into the center of each ball, forming a center indent, which creates a sort of disc that has a hole.
- Once all have been formed, transfer them to a baking sheet (no more than 4 to one baking sheet), cover with saran wrap and let rise for 45 minutes to an hour. Make sure there is enough space between them so that they aren't touching when rising.
Blind Bake
- Preheat oven to 375°
- Once dough has risen, use your fingers to press into the center of each bun to create a well, making sure to keep the edges risen because you don't want the edges to deflate. Then add an oven-safe cup or bowl (I used a ramekin with a 3.5 in diameter) in the center.Instead of ramekins you can place parchment paper and then add pie weights or dry beans, but I had neither so I used ramekins.
- Bake for 5-7 minutes. Remove the ramekins carefully (they'll be SUPER hot), then bake for 1-2 more minutes.
Baking Breakfast Brioche Buns
- Remove from the oven, then press down in the center of each bun to make space for the egg, then add your eggs to each of the buns. Sprinkle with salt and pepper and then bake for 10-17 minutes, depending on how cooked you like your eggs. I like mine set but runny yolk, so I cooked mine for about 12 minutes. Check after 10 minutes and then gauge from there how you like it.
- Once baked, remove from the oven and add whatever toppings you desire.
Notes
Reader Feedback
Since developing my first brioche bun recipe in 2022, I've had many people remake them, with such great feedback. I have, however, had people mention that the dough can be a little too sticky/wet and they needed to add more flour. For this reason, I went back to the drawing board to test the recipe with ¼ cup less milk, so only ¾ cup total milk instead of 1 cup, and it turns out great! However, this is with my controlled environment, and with using a scale to weigh my flour. If you're a long-time reader who has had success with a whole cup of milk, then keep making the recipe that way. Tips for the best results:- Measure Flour Correctly: As always, with any recipe, use a kitchen scale, as it is the best form of measuring your ingredients. If you don't have a kitchen scale, fluff your flour, scoop flour with a spoon into a measuring cup and level off.
- Don't Skip Kneading: Knead the dough for at least 10 minutes before adding the softened butter. This will ensure the dough forms and pulls away from the bowl. Then once you add the butter, knead for another 10-20 minutes until the butter is completely incorporated and the dough has pulled away from the bowl again.
- Don't add too much flour: This dough will be tacky, but shouldn't stick to your hands. It will also be very silky (this due to all the butter added). If while kneading, the dough doesn't come together after 15 minutes, you can add one tablespoon of flour at a time. But be patient before adding the flour. You don't want a dry dough.
- Make Ahead: You can absolutely make this recipe ahead of time by letting the dough proof in the refrigerator overnight for the first rise. When you're ready to use, remove from the refrigerator and continue with the recipe. You won't need to let the dough come to room temperature because you'll still need to proof a second time, so it will have plenty of time.
- Proof in pre-heated oven: One trick I love doing is to pre-heat the oven to 170 degrees Fahrenheit, then turning off the oven and letting my dough proof in the oven. This cuts down on proofing time, especially if I'm in a hurry, but it also helps in the winter when it's especially cold.
- Windowpane test: To know if your dough is ready, perform the windowpane test where you take a small piece of dough and stretch it out between your fingers. If it stretches out without tearing and light can pass through, then it has passed the windowpane test. If it tears, let the dough knead another 5 minutes, then perform the test again.
- Humidity: Due to reader feedback, I've updated the recipe to reduce the amount of milk to ¾ of a cup instead of a whole cup. See Reader feedback for more info.


Comments
No Comments